Is your once-thriving pothos looking a little worse for wear? Maybe its leaves are drooping, its growth has slowed, or it seems thirstier than usual. If so, your beloved plant might be suffering from a common houseplant ailment: rootboundness.
With a little TLC, you can nurse your rootbound pothos back to health and watch it thrive once again. So, grab your favorite gardening tools and let’s get started!
Pothos Being Rootbound

Let’s talk about our green friend, the pothos plant, and what happens when it becomes “rootbound.” Now, don’t worry, it’s not as scary as it sounds!
When a pothos plant becomes rootbound, it means that its roots have outgrown their cozy home in the pot. Think of it like your favorite pair of jeans becoming a little too snug. The roots have been growing and thriving, but they’ve run out of space to stretch out.
As a result, these adventurous roots start to get tangled and twisted around each other, forming a tight ball. It’s like a root party that’s gotten a bit out of control! But here’s the catch: this root ball can actually cause some problems for our leafy friend.
You see, when the roots are all packed together, it becomes harder for them to get the oxygen and water they need. It’s like trying to breathe in a crowded room or drink from a tiny straw. Not ideal, right? And just like us, plants need those essential nutrients to stay healthy and happy.

Author Note:
So, if you notice your pothos plant looking a bit cramped in its pot, it’s time to give it a little breathing room. Repotting it into a larger container will allow those roots to spread out and continue their growth journey.
Signs of a Root Bound Pothos
When a Pothos plant becomes root bound, several signs can indicate that it’s time for repotting. Being aware of these symptoms is crucial for the health and well-being of the plant.
Here are the key signs to look out for:
Visible Roots at the Surface or Bottom of the Pot
One of the most obvious signs of a root bound Pothos is when roots start appearing on the soil surface or growing out of the drainage holes at the bottom of the pot.
Slow Growth or Stunted Growth
While Pothos are typically fast-growing plants, a root bound Pothos may exhibit significantly slowed or stunted growth, as the crowded roots struggle to absorb sufficient nutrients and water.
Roots Circle or Wrap Around the Inside of the Pot
When you remove the Pothos from its pot, you might notice that the roots have formed a tight, dense mat that mirrors the shape of the pot, often circling around the interior.
Soil Dries Out Quickly or Water Runs Straight Through
When a Pothos is root bound, there’s less soil to retain water, so the soil may dry out much faster than usual. Alternatively, water might run straight through the pot without being absorbed, indicating that roots, not soil, are filling the pot.
Wilting or Yellowing Leaves
Even with regular watering, a root bound Pothos may start to show signs of distress like wilting or yellowing leaves, due to its inability to absorb enough water and nutrients.
Pot Bulging or Breaking
In extreme cases, the roots can become so overcrowded that they start to push against the sides of the pot, sometimes causing it to bulge or even crack.
Addressing root bound conditions promptly is crucial for the health of your Pothos. Typically, the solution involves repotting the plant into a larger pot with fresh soil, giving the roots more space to grow and access to the nutrients they need.

How to Fix Rootbound Pothos ( 2 Solutions)
First things first, let’s identify if your pothos is indeed rootbound. Once we’ve confirmed that, we’ll dive into the solutions: repotting and dividing the root mass.
But don’t worry, we’ll make sure to explain everything in a friendly and easy-to-understand way, so you can confidently give your plant the TLC it deserves. Let’s get started!
Solution #1: Repotting
Hey there! It’s time to give your root-bound Pothos some love and attention. Repotting is an essential task to ensure your plant’s continued health and growth.
Don’t worry, I’m here to guide you through the process step by step on how to repot your rootbound pothos effectively. Let’s get started!
Step 1: Choose the Right Pot
When it comes to choosing a new pot for your pothos, size matters. Look for a pot that is 1-2 inches larger in diameter than the current one and make sure it has proper drainage holes to prevent waterlogging.
This will give your plant enough room to grow without overwhelming it. Remember, a cramped pot can stunt your pothos’s growth and lead to root rot.
Step 2: Prepare the Potting Mix
Now, let’s prepare the potting mix. You can either buy a pre-made mix or create your own by mixing equal parts of peat moss, potting soil, and perlite or vermiculite. This will provide your Pothos with a well-draining environment.
Step 3: Water the Plant
A day before repotting, give your Pothos a good watering. This will help loosen the root ball and make it easier to work with.
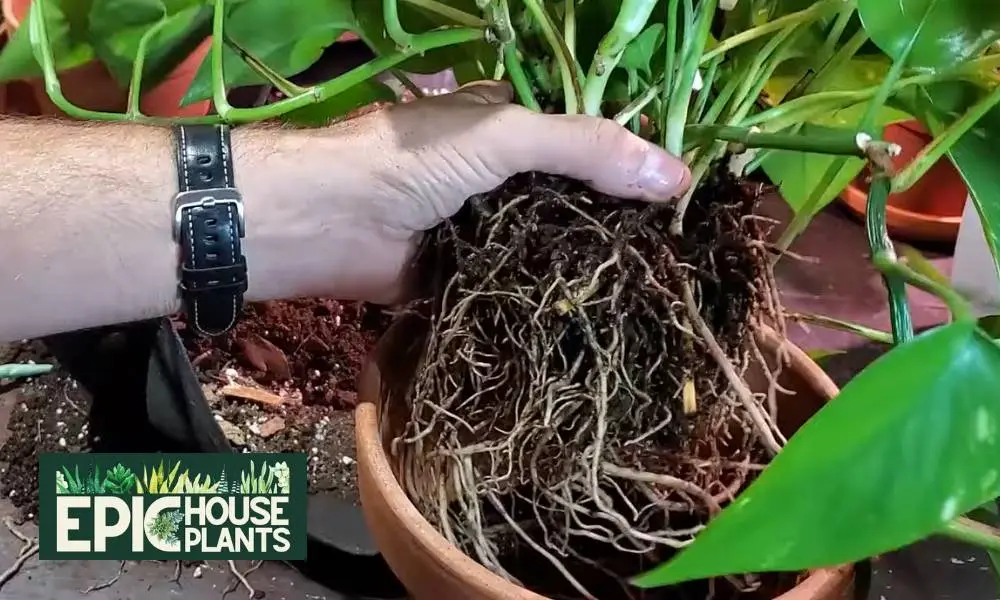
Step 4: Remove the Plant from Its Current Pot
Gently take the plant out of its pot. You may need to tap the sides of the pot or gently squeeze it to loosen the soil and roots. Be careful not to damage the plant or its roots.
Step 5: Examine and Trim the Roots
Take a close look at the roots. Carefully untangle any circling or bound roots. If the roots are very dense, you can use your fingers or a small tool to gently loosen them.
Trim away any dead, rotted, or excessively long roots with clean scissors or pruning shears. Just be cautious not to over-trim, as this can stress the plant.
Step 6: Prepare the New Pot
Place a layer of fresh potting mix at the bottom of the new pot. This will provide a good foundation for your Pothos.
Step 7: Repot the Pothos
Position the Pothos in the center of the new pot. Make sure the top of the root ball is about an inch below the rim of the pot to allow room for watering.
Add more potting mix around the sides of the root ball, gently tamping it down to remove air pockets. Ensure that the plant is at the same depth it was in the original pot.
Step 8: Water the Repotted Plant
Give your newly repotted Pothos a thorough watering to settle the soil around the roots. Allow any excess water to drain out. This will help your plant adjust to its new home.
Step 9: Aftercare
Find a spot for your Pothos with indirect sunlight. Avoid direct sun exposure right after repotting, as it can stress the plant. Keep an eye on your plant for any signs of stress and adjust care as needed. Avoid fertilizing immediately after repotting; wait for at least 4-6 weeks to allow the roots to settle.
Step 10: Ongoing Care
Resume regular care for your Pothos, including proper watering, feeding, and providing adequate light. Make sure the soil remains moist but not waterlogged. Remember to check the roots every year or two to determine if further repotting is necessary.
By following these steps, you’re giving your root-bound Pothos the space and resources it needs to thrive. If you have any more questions or need further assistance, feel free to reach out. Happy repotting!

Solution #2: Dividing Rootbound Pothos
Dividing a rootbound Pothos is a fantastic way to propagate new plants while also addressing the rootbound issue. Don’t worry if you’re new to plant propagation – we’ve got you covered with this friendly step-by-step guide.
Step 1: Prepare Your Workspace and Gather Materials
Find a clean and spacious workspace where you can comfortably work. Gather the following materials: a sharp pair of scissors or pruning shears, pots for the new divisions, well-draining potting mix, and water.
Step 2: Remove the Pothos from Its Pot
Gently take the Pothos out of its current pot. If it’s tightly bound, you may need to tap the sides of the pot or carefully cut it away. Be gentle to avoid damaging the plant.
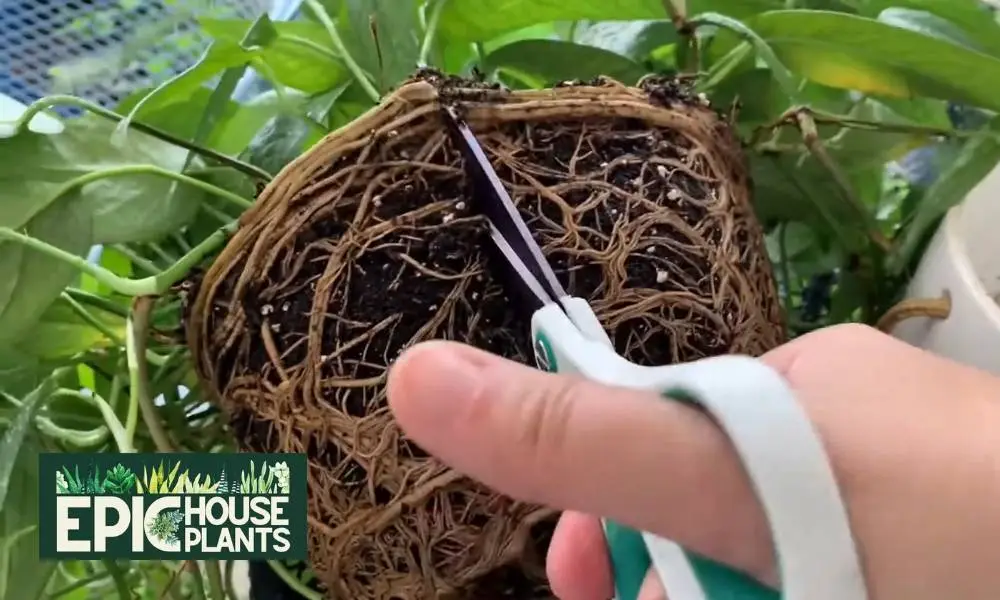
Step 3: Inspect and Detangle the Roots
Lay the plant on your workspace and take a moment to admire its beautiful foliage. Now, gently begin to untangle the roots. This can be a delicate process, so take your time to minimize any damage.
Step 4: Identify Natural Divisions
Look closely at the root ball and search for natural divisions where the plant can be separated easily. Pothos plants typically have multiple stems that can be divided at the base where they grow from the root system.
Step 5: Divide the Plant
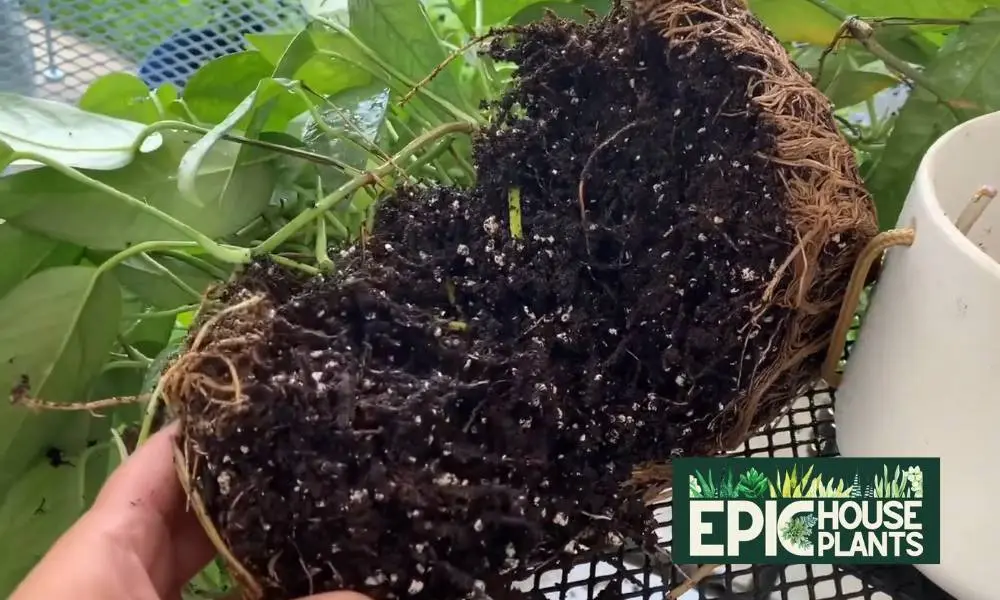
Using your hands or the scissors/shears, separate the plant into smaller sections. Each section should have a good amount of roots and at least a few leaves. If the roots are extremely dense, you may need to cut through them. Remember to keep as much of the root system intact with each division as possible.
Step 6: Pot the Divisions
Now it’s time to give each division its own space to grow. Fill new pots with fresh potting mix, ensuring they have drainage holes. Plant each division in its own pot, placing it at the same depth it was growing at before. Gently add soil around the roots and lightly tamp it down to secure the plant.
Step 7: Water and Care for the New Plants
After potting, give each new plant a thorough watering. Allow any excess water to drain out. Find a spot with bright, indirect light for your new divisions. Avoid direct sunlight for a few weeks as the plants establish themselves. Keep the soil moist but not waterlogged, and avoid fertilizing for at least 4-6 weeks.
Step 8: Monitor the Plants
Keep a close eye on the new divisions for signs of stress or shock. It’s normal for the plants to take a few weeks to adjust to their new environment. With proper care and attention, your new Pothos plants will thrive and bring joy to your indoor garden.
By dividing a rootbound Pothos, you not only rejuvenate the original plant but also gain new plants to grow or share.
Author Note:
This method of propagation is effective and provides a wonderful opportunity to expand your indoor garden. So grab your scissors, get your hands dirty, and enjoy the process of multiplying your Pothos plants!
Conclusion
Dealing with a rootbound Pothos can be challenging, but with the right knowledge and care, it’s a manageable issue. Regular pot inspections, timely repotting, and proper post-repotting care are crucial.
By providing your pothos with the room it needs to expand its root system, you enable it to continue thriving, producing those lush vines and vibrant leaves that you fell in love with in the first place.
So, the next time you notice slow growth or lackluster foliage in your pothos, remember that addressing rootbound issues is an essential part of keeping your indoor garden flourishing.
Author

Pudji Haryanto
Pudji Haryanto is a writer and urban farmer with a passion for cultivating plants. He has over 15 years of experience in agriculture and currently manages a 65,000 square foot rice-field and yard filled with various plants, including vegetables, spices, flowers, and garden plants.