Welcome, fellow plant enthusiasts! Ready to venture into the amazing world of soil propagation with your snake plant?
Buckle up, because we’re about to embark on a rewarding journey filled with patience, care, and, most of all, exciting new growth!

Tools and Materials for Soil Propagation
Plant propagation is an exciting journey and having the right tools and materials at your disposal can make a world of difference in your snake plant soil propagation experience.
Let’s embark on this green-fingered adventure and delve into the essential tools and materials you’ll need for successful soil propagation of your snake plant.
Prune Shears/Sharp Knife
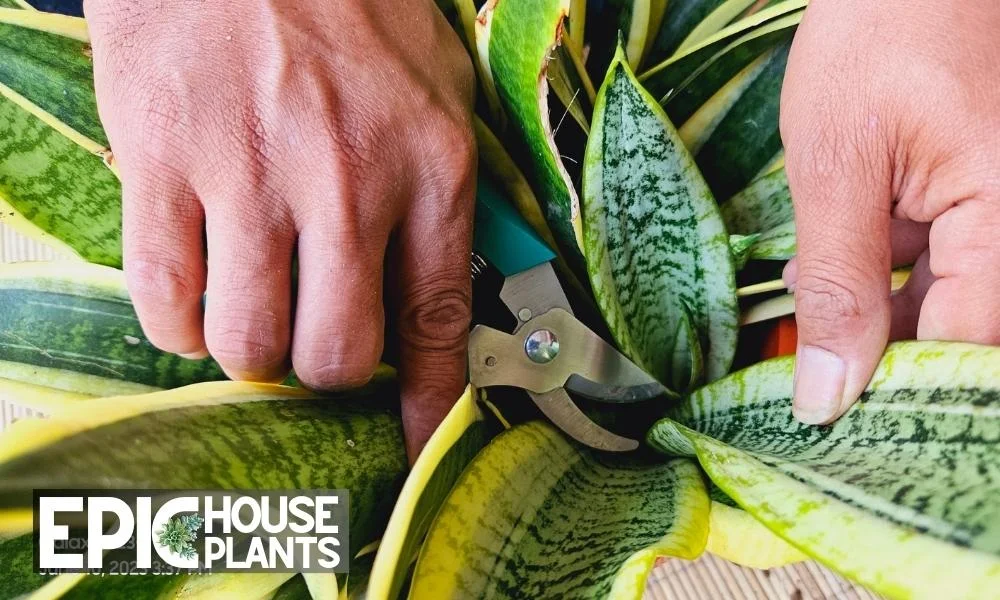
Starting off on the right foot requires the right tools. When it comes to preparing your snake plant for propagation, a sharp knife or pair of pruning shears is crucial.
Not just any old knife or shears will do, though. Make sure your tools are sharp, clean, and free of rust. The sharper your tools, the cleaner your cut will be, reducing damage to the plant and promoting healthier growth.
Author Note:
Sterilizing your cutting tools before use can help prevent the spread of diseases, ensuring a healthy start for your new snake plant.
Nursery Pot

When it comes to pots, size matters. For your snake plant cuttings, opt for a nursery pot that’s not too tall and has a diameter of 4-5 inches. This will give your cuttings plenty of space to develop their root systems without being overwhelmed by too much soil.
Additionally, ensure your pot has good drainage holes. Snake plants dislike waterlogged soil, so a well-draining pot is a must to avoid root rot.
Also Read: Repotting Snake Plant Like a Pro: A Comprehensive Guide
Cactus Potting Soil

Choosing the right soil can make or break your snake plant propagation experience. Snake plants prefer well-draining soil, and cactus potting soil fits the bill perfectly. It offers excellent porosity, ensuring water drains away quickly instead of sitting around the roots.
Cactus potting soil also provides some nutrients that will help your snake plant cuttings grow strong and healthy. Moreover, the soil is structured to promote good airflow, which is vital for root health.
💡Just remember, successful propagation doesn’t happen overnight, it takes time, patience, and a bit of green thumb magic. But with these essentials, you’ll be off to a great start. Good luck with your propagation adventure!
The Easy Peasy Guide to Soil Propagating Your Snake Plant
Step 1: Picking Your Star Leaf

We begin by picking a strong and healthy leaf from your snake plant. Look for one that’s decked in a rich dark green, the color of plant health. Avoid old, weary-looking leaves – we want our new plant to start strong!
Step 2: Making the Ideal Snip
Time to make the cut! Using clean garden shears, chop off the chosen leaf as close to the soil line as possible. The closer to the base, the better – it boosts the success rate of your propagation!
Step 3: Slicing and Dicing the Leaf
Your next move? Split your leaf into several parts, each around 4 inches long. Make a “V” cut at the bottom of each segment – upside down, of course. This hack broadens the root space surface, speeding up the root growth. But don’t forget to remember which side is down!
Step 4: Callous Over Time
Now, it’s nap time for your cuttings. Give them a 1-2 day rest to form a protective callous over the cut areas. Keep them comfy at room temperature during this time.
Step 5: Get the Cuttings Rooted
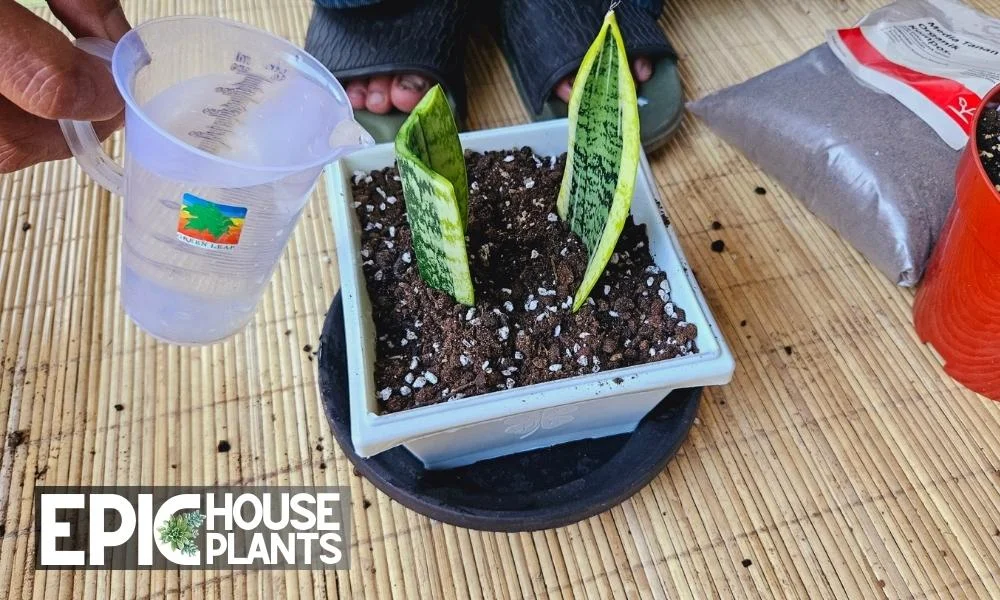
When the callous is formed, it’s time to introduce your cuttings to their new home – the soil in a nursery pot. Plant them with the “V” cut (bottom part) nestling into the soil.
Step 6: Hydrating Your Future Plant

Once snug in the soil, hydrate your cuttings with a good watering. Remember, snake plants don’t like to swim – just a splash to dampen the soil will do!
Step 7: A Test of Patience
Now comes the test of your green thumb patience. In a few weeks, tiny roots will peep out. Only water again once the soil is bone dry. Aim for a balance – keep the soil moist, but not a soggy mess.
A gentle check for roots every one or two weeks lets you track your cuttings’ growth. Be gentle though, they’re just getting started!
Step 8: Hello, Baby Plants!
The grand finale? After 2-3 months, you’ll be greeted by adorable ‘pups’, the baby snake plants. The sight of successful soil propagation! Keep an eye on their growth, ensuring the soil stays just-right moist and provide needed care.
Author Note:
Just remember – patience is the name of the game here. It might take a while for your cuttings to root and grow, but the joy of seeing those first ‘pups’ will be worth all the wait! Let’s start propagating!
Pros and Cons of Snake Plant Soil Propagation: A Detailed Insight
While propagating snake plant in water is popular, soil propagation offers its own unique set of advantages and challenges. In this section, we delve into the pros and cons of snake plant soil propagation. Let’s dig in!
The Pros of Soil Propagation
1. The Simplicity of One-Step Method
With soil propagation, there’s no need to first keep the cuttings in water. It’s a straightforward one-step method where you directly plant the leaf cuttings in soil and let Mother Nature take over. This saves you from the hassle of monitoring and changing water regularly, as required in water propagation.
2. Mixing it Up
Soil propagation offers a fun twist – you can mix leaves from different varieties of snake plants in the same pot. This creates a striking visual effect and diversity in your indoor garden, all in one pot!
3. Mass Production:
Soil propagation can yield a wealth of new plants from just one mother plant. With each leaf cutting having the potential to grow into a new plant, you’ll soon have a thriving snake plant family from a single parent!
The Cons of Soil Propagation
Despite these advantages, soil propagation isn’t without its challenges. Here are a couple of potential cons to keep in mind:
1. Variegation Loss:
If you’re propagating a variegated snake plant (one with different colors in its leaves), soil propagation might not be your best bet. The new plants may lose their beautiful patterns and revert to a solid green color.
This happens because the variegation is a result of cell mutation in the mother plant, and this characteristic is often not passed down to the offspring through leaf cuttings.
2. Invisible Root Growth:
Unlike water propagation, where you can witness the magical moment of root sprouting, soil propagation keeps this exciting process hidden beneath the surface.
The root growth isn’t visible, which might make it slightly more challenging to gauge if your propagation is successful or if your plant needs different care.
Soil propagation of snake plants can be a fulfilling venture, yielding a beautiful array of new plants. While there are certain drawbacks, understanding these ahead of time will ensure you are better equipped to handle them.
💡Every gardener has their unique style, so don’t hesitate to experiment to find the propagation method that works best for you. Happy gardening!
Bonus Tips for Successful Soil Propagation of Snake Plants
Use of Cinnamon:
Did you know your kitchen cupboard might hold a secret weapon for plant propagation? Cinnamon is a natural anti-fungal agent and can be lightly dusted on your snake plant cuttings before planting them in soil to prevent potential fungal issues.
Bottom Watering Technique:
Instead of watering from the top, try bottom watering. Place your pot in a larger dish of water and let the soil soak up the water it needs. This technique can help avoid overwatering and stimulate stronger root growth.
Regular Rotation:
Make sure to rotate your pot regularly for even growth. Plants naturally grow towards light, so rotating your snake plant will help it grow evenly, rather than leaning to one side.
FAQs
Q: What is meant by separating a snake plant?
A: Separating a snake plant refers to dividing a mature plant into smaller individual plants. This process is also known as propagation or dividing.
Q: Do I need to fertilize my snake plant cuttings?
A: No, Generally, snake plant cuttings don’t require fertilizer initially. Once they have rooted and started to grow, you can use a balanced houseplant fertilizer as directed on the product packaging.
Q: Can I use regular potting soil for my snake plant cuttings?
A: Yes, But it’s best to use a well-draining soil, like cactus potting soil, for snake plants. They prefer soil that allows water to drain quickly to prevent root rot.
Q: Can I propagate any type of snake plant in soil?
A: Yes, while most snake plants can be propagated in soil, variegated types might lose their color patterns. This happens because the variegation is often not passed down to the new plant through leaf cuttings.
Final Words
And there you have it, folks! Your comprehensive guide to propagating snake plants in soil. As you embark on this green journey, remember that patience and attentiveness are your greatest allies.
Don’t get discouraged if things don’t go perfectly the first time – learning is part of the process. With each new leaf and root, you’re not only growing a snake plant but also your skills as a gardener.
So, put on your gardening gloves, get your hands a little dirty, and experience the rewarding journey of propagation. Before you know it, you’ll have a thriving snake plant family, each one a testament to your nurturing touch. Happy planting!
Resources:
- mrec.ifas.ufl.edu | Sansevieria Production Guide
Author

Pudji Haryanto
Pudji Haryanto is a writer and urban farmer with a passion for cultivating plants. He has over 15 years of experience in agriculture and currently manages a 65,000 square foot rice-field and yard filled with various plants, including vegetables, spices, flowers, and garden plants.
